Saturday

WELCOME :o)

* * * SIT & STAY A WHILE * * *

*****

Here you'll find:

all things  home, family, creativity,
organizing,  cool products, & more!

*****
 If you're interested in REAL whole foods nutrition, 
natural/holistic healing,
& food storage/preparedness...

Please click the green & pink link below to visit my newest & best website!:


Thanks for visiting. Enjoy, & please come back often.
PS:  I love visitors & I love comments!

Friday

THE KITCHEN ISLAND

I LOVE HUGE KITCHEN ISLANDS!!!
If there were ever one thing in my kitchen I would want above ALL else, 
it would be a big huge square or rectangle kitchen island!
I'm addicted to playing with food, & I believe a person
can never have too much counter space!
:)


Wednesday

Squash & More Squash!

On my "other" blog,  www.onehappyhomemaker.blogspot.com  I posted several ideas for using up all that zucchini that's coming out your ears.  But what about all the squash???

Currently, I have 4 zucchini & 13 yellow squash.  That is not even from my garden!  That's just from my friendly neighbor who loves to share!  Look at this!!!  :)

Well, I've wondered about something, & I found out today, that you can use yellow squash just as  you would zucchini in breads, cakes, brownies, lasagna, casserole, soup, etc!  The taste is so similar, that no one will be able to tell the difference!

Yay for me!  (And you, of course!)  All that squash is going to the dehydrator in slices & shreds, & I'll have a TON of it ready whenever I decide to bake!  Do you have any awesomely yummy zucchini/squash recipes?  If so, please leave a comment & share!

Monday

Organic vs. Non Organic?


What's the difference, & why does it matter?  Or DOES it?

OK - Yes, our family still eats mostly non-organic food.  But only because it is still more expensive, and there is not as much food choice at the grocery store.  However...
Prices ARE coming down as more people are opting to return to the organic way of life, & the selection is definitely better than it was a few years ago.  And if non-organic bananas are .59/lb versus organic bananas at .89/lb - I usually go for the organic.  It's not *THAT* much more expensive, and definitely worth my family's health. 


For those of you who don't understand what "organic" means & tend to turn your nose up at the term,  here is the plain and simple definition from Wikipedia:

Organic foods are foods that are produced using methods that do not involve modern synthetic inputs such as synthetic pesticides and chemical fertilizers, do not contain genetically modified organisms, and are not processed using irradiation, industrial solvents, or chemical food additives.[1]
For the vast majority of human history, agriculture can be described as "organic"; only during the 20th century was a large supply of new synthetic chemicals introduced to the food supply.


(((And this includes hormone & additive induced meats)))


Check this out :
  • Organic farms do not consume or release synthetic pesticides into the environment—some of which have the potential to harm soil, water and local terrestrial and aquatic wildlife.
  • Organic farms are better than conventional farms at sustaining diverse ecosystems, i.e., populations of plants and insects, as well as animals.
  • When calculated per unit area, organic farms use less energy and produce less waste, e.g., waste such as packaging materials for chemicals.
Now, if you actually read that,  you saw that organic is simply 'all natural'...  THE WAY GOD PUT IT ON THE EARTH, IN ITS ORIGINAL FORM,  WITHOUT ALL THE NASTY JUNK, as that good ol' definition listed.  Yuck!!!  Is it any wonder why there are so many growing illnesses/conditions, & people just don't feel good so often anymore?  Your body is a temple.  Remember that?  I'm pretty sure God wants our bodies to be as healthy as possible, so that it's in optimal condition for housing our wonderful spirits! 

Did you know that if you simply grow a garden in your back yard & don't use pesticides, chemical fertilizers, etc...  (& use seeds that haven't previously been grown with that junk)... that you've just grown an ORGANIC garden!?  Surprise, surprise!

Over the past 3 years, my family has made the change to almost all whole foods.  There's been a big change in how we all feel, since we did.  All organic is coming for us, as we are able.  I want my family to eat these beautiful foods as they were intended, by God, in their original natural form, & our bodies & minds will be healthier & thank us for it.   I'm determined!  :)

Do you have to do this too?  No.  Of course not.  It's your choice, obviously.  But as Martha Stewart says.....  "It's a Good Thing!"  

More on this subject later...  But for now, here's a chart for you to take a look at!


CLICK THE CHART TO MAKE IT LARGER

Friday

Freezer Storage

I think this is a GREAT idea to maximize your freezer space. If you haven't figured it out already... Put soups, stews, chili, fruits, veges, beans, cookie dough, (pretty much anything) in a freezer bag. Squeeze out as much of the air as you can & lay it flat after it's closed. Label it, then lay it on a cookie sheet & freeze. After it's frozen, it's easy to stuff in the freezer, cause it's flat!

To make it even better, buy some bins & "file" the flat frozen bagged food vertically by type. Then you can pull out a bin & flip through till you find what you need! I do this all the time now. Your own filing freezer! :)

Thanks to the "Real Simple" magazine for this great idea!

Sunday

Failed Bread

My bread didn't rise. It's only happened a couple of times, but it's REALLY annoying! I stood there staring at it thinking what a waste. Then, I had one of those little light bulb moments.

I started rolling out balls of the dough flat. Then I 'fried' them in a frying pan, just like tortillas. Homemade flat bread! 3 failed loaves of bread made over 60 flat breads, & they were a huge hit :) It was great!

The flat bread from the store is way expensive, & it doesn't taste very great to me. These were yummy, just like homemade bread, & they work for all kinds of things...

Meat sandwiches, PB&J sandwiches, personal pizza, burritos, munchy snack...

A little extra honey makes them sweet & awesome with a little homemade jam too - YUM!

The tall stack is the dough (rolled out)... before being cooked. After they were cooked, they went straight into the gallon bag to stay soft.

They freeze great too!

(You don't have to wait for your bread to fail before making them!...)

Instant Oatmeal Packets - YUM!


Easy to make, fun to make, & cheap to make! Did you know that quick oats are simply chopped regular oats? To make your own "instant" oats, just put them in a blender for a few seconds, & voila! I like to blend my oats long enough to almost powder them, because it makes a creamier bowl of oatmeal!

I finally got around a few months ago to making my own instant oatmeal packets. Something I've wanted to do for a long time... but just didn't. I'm reeeeeaaaaalllllyyyy glad I did!

These are so yummy. And surprisingly, they're MUCH more filling than the store bought ones, which we usually ended up eating 3 or 4 of to fill us up!

Assembly line style makes this way fast. Just line up your little baggies & ingredients, & scoop one ingredient at a time over & over till you're done... Then move on to the next ingredient. It takes just minutes to make 30 or 40 packets!

AFTER you've gotten all your basic flavor bags made, go back through & add your favorite flavors to them. Variations are listed below the basic recipe:

ORGANIZING YOUR PACKETS (without having to label every single bag)... put all the bags of each different flavor in a plastic shoe box & label just the box. This way, you'll know which is which just by looking at the container.

- - - - - - - - - -

Instant Oatmeal Packet Basic Recipe - & Varieties: (Per ONE Packet)

Mix the following in snack or sandwich baggies to make individual oatmeal packets:

¼ c. powdered oats (reg. oats lightly powdered in blender)
1 T. powdered milk
1 T. powdered sweetener (un-refined sugar, coconut palm sugar, powdered stevia, xylitol etc...)
pinch of sea salt (optional)


I just add very hot water & let it sit for a minute.  Microwaving kills the nutrients!

*****

VARIATIONS - (Adjust ingredients & amounts to your own taste...) 

Don't forget to double or triple the flavor ingredients, depending on how many packets you put in each bag!

PS:  I HAVE NOW SWITCHED TO ALL NATURAL SUGARS/SWEETENERS & HAVE GOTTEN RID OF ALL WHITE REFINED, PROCESSED, & ARTIFICIAL SWEETENERS.  YES, THIS INCLUDES WHITE & BROWN SUGAR!  IT IS YOUR CHOICE, OF COURSE, BUT IN PLACE OF WHITE SUGAR, I NOW USE RAW SUGAR, XYLITOL, OR STEVIA, & IN PLACE OF BROWN SUGAR, I NOW USE RAW COCONUT PALM SUGAR.  AND THEY ARE ALL CHEAPER THAN THAT NASTY POISONOUS ARTIFICIAL SPLENDA OR ASPARTAME :)

Apple-Cinnamon - To each packet, add 1 Tbsp. sugar, 1/4 tsp. cinnamon, and 2 Tbsp. chopped dried apples.

Apple Pie - To each packet, add ¼ tsp. apple pie spice

Brown Sugar/Cinnamon - To each packet, add 1 Tbsp. unrefined coconut palm sugar & 1/4 tsp. cinnamon

Raisins & Brown Sugar - To each packet, add 1 Tbsp. unrefined coconut palm sugar and 1 Tbsp. raisins.

Health Nut - To each packet, add 1/2 Tbsp. each wheat germ, ground flax seed, chopped almonds

Fruit & Cream - To each packet, add 1 Tbsp. organic non-dairy coffee creamer (without un-natural ingredients) and 2 Tbsp. dried fruit & / or powdered fruit.

Maple Nut - To each packet, add 1 Tbsp. dehydrated 100% pure maple syrup crystals & dried fruit.

Pumpkin Pie - To each packet add ¼ tsp. pumpkin pie spice & unrefined coconut palm sugar

Monday

Oatmeal Raisin Granola Bars

I FOUND THE RECIPE!!!


OK... After DAYS of searching for the recipe I used to make these, I finally found it buried under a pile of papers. I guess I should clean up, huh! So here it is:

2 c. rolled oats
3/4 c. wheat germ
1/2 tsp. cinnamon
1/2 c. sunflower seeds (or mixture of any seeds like chia, flax, etc...)
8 oz. raisins or dried cranberries

2/3 c. organic coconut palm sugar or xylitol
1/2 c. honey
4 Tbs. organic butter
2 tsp. vanilla
1/2 tsp. sea salt or Himalayan salt

Mix sugar, honey, butter, vanilla, & salt. Melt & stir well.

Mix melted items & remaining dry ingredients in large bowl & stir well. Keep stirring! It may seem dry, but it WILL get sticky if you keep going..... :)

Line casserole dish with large piece of waxed paper.

Dump mixture in casserole dish & spread. Fold wax paper over top, OR add a new piece on top. Using hands, press hard to flatten & compact mixture.

Let cool completely!

Lift granola bars out of dish with waxed paper & cut into bars or squares. (Or, if you didn't use waxed paper, just cut in the dish & remove.)

Store in air tight container or wrap individually in plastic wrap.

How easy is that!?!?

Thursday

Winter Gardening?


Did you know you can have a garden year round? Now, you might not want to plant corn inside, or you'll have stalks up to your ceiling... but there are several things that are great for planting in your house. Here is a chart that provides basic information on container/indoor gardening:

AND DON'T FORGET THOSE SPROUTS & HERBS -
THEY TAKE UP VERY LITTLE ROOM!

Keep your plants near a window, preferably on a south facing wall...(More heat & more light)


GROWING VEGETABLES IN CONTAINERS:

1* Vegetable Name

2* Light Requirement (see FS/PS info below)

3* Minimum Container Size

4* Distance (inches) between plants in container

5* Days from Seed to Harvest

6* Comments

----------
FS = Full sun
FS/PS = Full sun/Part shade
PS = Partial shade
------------------------------

Beans, bush
FS
2 gal.
2-3"
45-60 days
Several plantings, two-week intervals

Beets
FS/PS
1/2 gal.
2-3"
50-60 days
Thin plants when 6 to 8 inches tall

Carrots
FS/PS
1 qt.
2-3"
65-80 days
Several plantings, two-week intervals

Cabbage
FS/PS
5 gal.
12-18"
65-120 days
Requires fertile soil

Chard, Swiss

FS/PS
1/2 gal.
4-6"
30-40 days
Harvest leaves for long yield

Cucumbers

FS
5 gal.
14-18"
70-80 days
Support vining types

Eggplant
FS
5 gal.
1 plant per container
75-100 days
Requires fertile soil

Kale
FS/PS
5 gal.
10-15"
55-65 days
Harvest leaves

Lettuce, leaf

PS
1/2 gal
4-6"
30-35 days
Harvest leaves

Mustard greens

PS
1/2 gal.
4-5"
35-40 days
Several plantings, two-week intervals

Onions
FS/PS
1/2 gal.
2-3"
70-100 days
Require lots of moisture

Peppers

FS
2 gal.
1 plant per container
110-120 days
Require hot weather

Radishes

FS/PS
1 pint
1"
25-35 days
Several plantings, weekly intervals

Squash

FS
5 gal.
1 plant per container
50-60 days
Plant only bush type

Tomatoes
FS
5 gal.
1 plant per container
55-100 days
Stake and prune or cage

Tomatoes,
cherry

FS
1 gal.
1 plant per container
55-100 days
Helps to stake and prune

Turnips
FS/PS
3 gal.
2-3"
30-60 days
Harvest leaves and roots

Monday

TOO MUCH ZUCCHINI???


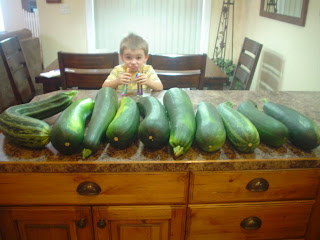
I read about one lady who did her first garden & planted 10 zucchini hills... Do you know what that produced? A whopping 16 bushels of zucchini!

Maybe you didn't end up with THAT many, but here are a couple of ideas for using up what you have left, after your neighbors finally tell you to stop donating it to them :)

If what I've shared here just isn't enough, then feel free to visit this site FULL of zucchini recipes!!!

www.basic-recipes.com/veget/zucchini.htm

----------------------------------------------
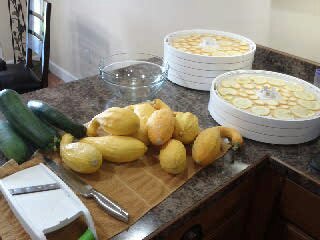
DEHYDRATED ZUCCHINI:

SHRED ZUCCHINI OR CHOP INTO SMALL PIECES, & LAY EVENLY ON DEHYDRATOR TRAYS. LET DRY TILL FAIRLY CRISPY, & STORE IN AIRTIGHT CONTAINER FOR FUTURE USE IN SOUPS, BREADS, PIZZA TOPPING, ETC...

----------------------------------------------
DEHYDRATED ZUCCHINI CHIPS:

CUT YOUR ZUCCHINI INTO THIN SLICES & LAY EVENLY ON DEHYDRATOR TRAYS. SPRINKLE LIGHTLY WITH SEA SALT OR YOUR FAVORITE SEASONING (BBQ, HERBS, LEMON PEPPER ETC...)
LET DEHYDRATE TILL SLIGHTLY CRISPY (THEY MAY STILL BEND JUST A LITTLE). STORE IN AIRTIGHT CONTAINER & SNACK AWAY!

----------------------------------------------
CARROT/ZUCCHINI PIZZA:

YOU'LL NEED A PIZZA CRUST (I'LL TRY TO POST A RECIPE LATER, BUT FOR NOW, JUST 'GOOGLE' IT :o)

ON TOP OF YOUR CRUST LAYER IN THE FOLLOWING ORDER:

PIZZA/PASTA SAUCE (WHATEVER TASTE YOU PREFER)
MOZZARELLA CHEESE
SHREDDED CARROTS
SHREDDED ZUCCHINI
LIGHT SPRINKLE OF SEA SALT & PEPPER (OPTIONAL)
A TINY BIT MORE CHEESE

BAKE AT 425 FOR 15-20 MINS...
(UNTIL CHEESE IS MELTED & TOP BEGINS TO BROWN)

*I'M THINKING NEXT TIME I MAKE IT I'LL ADD A LAYER OF CHICKEN TOO!
IT MIGHT EVEN BE YUMMY WITH FRESH RANCH DRESSING INSTEAD OF PIZZA SAUCE! MMMMM!!!!!

----------------------------------------------
CRUSTY TOP ZUCCHINI BREAD:

1 C. BUTTERMILK OR SOUR MILK (ADD 1T. VINEGAR TO REGULAR MILK)
1 1/2 C. ORGANIC COCONUT PALM SUGAR (OR 1/2 & 1/2 WITH XYLITOL)
2/3 C. OIL
1 LARGE ORGANIC EGG
1 1/2 C. SHREDDED ZUCCHINI
1/2 C. FINELY CHOPPED RAW NUTS
1 TSP. SEA SALT / HIMALAYAN SALT
1 TSP. BAKING SODA
1 TSP. VANILLA
2 1/2 C. WHOLE WHEAT OR OTHER WHOLE GRAIN FLOUR

TOPPING:
1/2 C. ORGANIC COCONUT PALM SUGAR - OR XYLITOL
1 T. MELTED ORGANIC BUTTER
1/2 TSP. CINNAMON

COMBINE LIQUID INGREDIENTS... ADD SIFTED DRY INGREDIENTS...THEN ADD ZUCCHINI & NUTS.
MIX WELL. POUR INTO 2 WELL GREASED LOAF PANS.

COMBINE TOPPING INGREDIENTS & SPRINKLE ON TOP.

BAKE AT 325 DEGREES FOR ABOUT 40 MINUTES. (DON'T OVER BAKE)
WHEN DONE BAKING, REMOVE BREAD FROM PANS AFTER 2-3 MINUTES & COOL ON RACK.

(YOU CAN LINE THE LOAF PANS WITH PARCHMENT PAPER ON THE BOTTOM, THEN GREASE THE SIDES FOR EASIER REMOVAL.)